In animation, there's more to animate than simple movement. Animation requires thinking about motion, timing, and smoothness of action. Almost anything in Maya with a number attached to it can be animated. Maya simplifies your work in creating the essence of animation---timing and motion. With maya , you can animate virtually anything you can imagine, no matter how surreal.
Animation Control and Interface
With Maya's animation controls, you choose how to key and play an animation. Two components of Maya's user interface are specific to animation: the Range Slider and the Time Slider. You can also quickly access and edit animation preferences from the animation controls area.

Fig 7-1 Animation controls
Between the Range slider and the Animation Preferences button are the current character control features and the Auto Key button.
Time Slider
The Time Slider is a vital part of the animation interface in Maya. The Time Slider Controls the Playback range, keys and breakdowns with in the playback range.

Fig7-2 Time slider
Click in the Time Slider area and drag left and right to "scrub" the animation back and forward in time.
Key Ticks
Key Ticks are red marks in the Time Slider where you set a key for the selected object. Breakdowns are a special type of key .The visibility of Key Ticks can be turned off or on in the Preference window. The current Time indicator is a gray block on the Time Slider. You can drag it to move forward and backward in your animation.
Current Time Field
A black line indicates the current time field. When keys have been set for the currently selected object, thin vertical red lines appear in the Time Slider area to indicate the times for those keys.
Range Slider
The Range Slider controls the playback range reflected in the Time Slider. The Range Slider sets the total length of the animation in frames. You can also use the Range Slider to temporarily limit the range of playback and set the playback start and end frames.

Fig 7-3 Range slider
You can toggle whether the Range Slider is Displayed or hidden by selecting Display>UI elements>Range Slider.
Animation Start Time sets the start time of the animation.
Animation End Time sets the end time of the animation.
Playback Start Time This shows the current start time for the playback range. You can change it by entering a new start time.
Playback End Time This shows the current end time for the playback range. You can change it by entering a new end frame.
Range Slider Bar This lets you control the playback range of your animation up to the limits of the Animation start/end settings.
you use the Preferences dialog box to change values for the animation timeline and playback. You can also set the total time for your animation, the size of the timeline , and other related features.
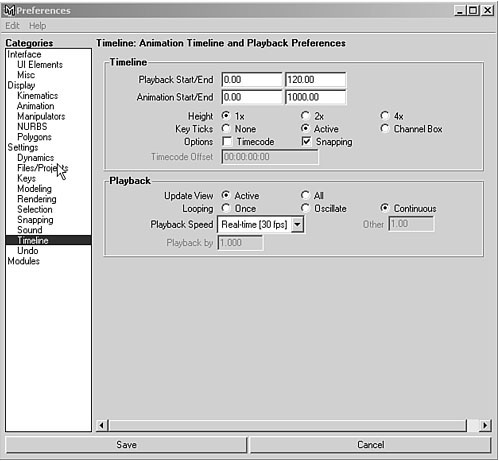
Fig7-4 Preferences dialog box
Terms in Animation
Frame Rate
Frame rate is the first aspect of animation. By default, Maya sets your animation to Film, which plays at 24fps.You use 30fps in the United States and 25fps in other countries.
Range
The range of an animation determines the total length in frames. Then, multiply the animation's length in seconds by the frame rate .For e.g in this case you are using 24fps and animation length is of 2seconds.
24fps X 2secs =48 Frames
Setting Keys
You can set a Key by selecting Animate >Set Key. The attributes set by this menu item depend on the set Key option settings.
Animation Types
There are following types to animate your scene.
Path Animation
In this method, you create a NURBS-based curve and then attach an object to it in your scene. The object then follows the curved path to simulate motion. You can choose at which time the object is positioned at any point along the path, so the object can reverse itself, pause, or oscillate, if you want. The object automatically rotates from side to side as the curve changes directions. If the object is geometry, it can also be automatically deformed to follow the contours of the curve.
Select Animate>Motion paths>Attach to Motion path
To Animate an object along a surface
Choose create >Nurbs Primitives > Plane to create a Nurbs plane.
Select Modify>Transformation Tools>Proportional Modification Tool to introduce contours on the plane.
Select Modify > Make Live ,then draw a curve on the plane.
Create an object to animate along the path , and shift -click on the curve on surface to select it.
Select Animate>Motion Paths >Attach to Motion Path option window. Ensure that follow is on ,and set the up direction to normal so that the object will stay normal to the surface.
Click play to see your animation.
Flow Path Object Function
The Flow Path Object function creates a lattice around an object .
Select Animate>Motion paths>Flow Path Object
Keyframe Animation
Keyframe animation is the standard animation method. In this method, you set keys for an object's extreme positions and let the computer fill in the in-between motion. A key is an anchor point for a particular attribute at a designated time. When the animation reaches that specified time, the object's attribute will be at the value you set. As you set keys, you specify the time at which those changes in the attribute's value take place.
To set keys with the auto keyframe method, you click the Auto Keyframe button in the Range Slider (it turns red to indicate that it's enabled). With auto keyframing, you can animate quickly by simply dragging the Time Slider to a given frame and then changing an attribute.
Nonlinear Animation
Nonlinear animation is a more advanced method of animation. Unlike keyframing, nonlinear animation is completely independent of time. You blend and layer animation sequences—called clips—to set up the motion for objects. You can also use this method to explore variations in parts of the animation without losing your previous work or affecting other parts of the animation. For example-you can make the walking part of the animation a clip and then adjust the leg motion without affecting the way the rest of the character moves.
Graph Editor
The Graph Editor is a helpful tool for tweaking values for keys you have set. It gives you a visual representation—a curved line—of the attributes that are animated. The animation time goes from left to right, and any keyed variable appears as a line that ramps up or down to indicate its value over time. It can help you visualize how things are changing and how fast. You can pan and zoom this panel like any other.
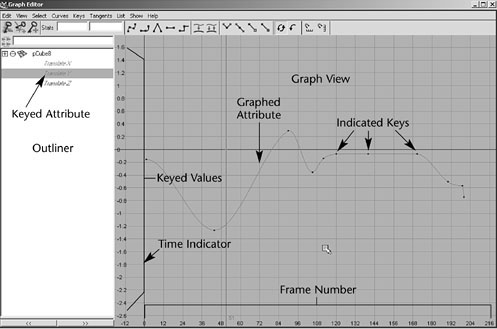
Fig7-5 Graph Editor
To use it as a free-floating window, simply open it from the Hotbox (Window >Animation Editors> Graph Editor).
Graph Editor's Components
Menu bar
The Graph Editor menu bar contains tools and operations for manipulating animation curves and keys with in the graph view of the Graph editor. The Edit menu is similar to the one in text editors or word processors, except that you're working with keys instead of text.
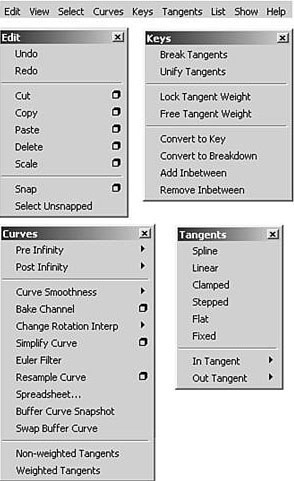
Fig 7-6 Menu Bar
The Edit Menu
The menu items appear under Edit menu behave in a similar fashion to the main Edit menu in the modeling view.
The View Menu
This menu controls which components are visible, and therefore editable, in the graph view of the Graph Editor.
The Select Menu
These options control which component of an animation curve are available for selection and editing.
The Curves Menu
The Curves menu gives you control over how the curves are set up with the keys in your scene.
The Keys menu
This menu includes Tangents which causes the manipulation of an in or out tangent handle.
The Tangents Menu
This describes the entry and exit of curve segments from a key.
The List Menu
This menu Loads the objects.
Toolbar
The toolbar gives you quick access to functions for modifying animation curves and keys.
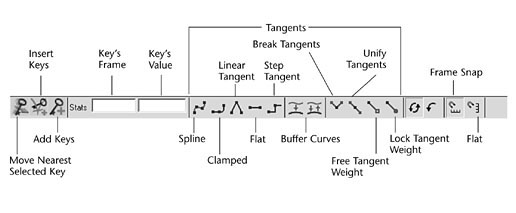
Fig 7-7 Toolbar
Buffer curves Use Buffer Curve snapshot and swap Buffer curves to compare changes to the current animation curve with its previous shape.
Break Tangents Allows manipulation of the in and out tangent handles individually so you can edit the curve segment entering the key without affecting its opposite handle.
Unify Tangents causes the manipulation of an in or out tangent handle to affect its opposite handle equally. It retains the relative position of the tangent handles even after tangents are individually adjusted.
Lock Tangent Weight specifies that when you move a tangent ,only its angle can be changed.
Free Tangent Weight specifies that when you move a tangent ,only its angle can be changed. This allows the weight of a tangent to be adjusted as well as the angle.
Clamped tangent creates an animation curve that has the characteristics of linear and spline curves. The key's tangents will be spline unless the value of two adjacent keys are very close.
Step tangent creates an animation curve whose out tangent is a flat curve.
Flat Sets the in and out tangents of the key to be horizontal.
The Dope Sheet
The Dope Sheet is another animation editor in Maya that is similar to the Graph Editor. Instead of displaying curves, the Dope Sheet displays key times as colored rectangles and lets you edit event timing in blocks of keyframes and synchronize motion to a sound file.
To open the Dope Sheet
Select Window > Animation Editors > Dope Sheet
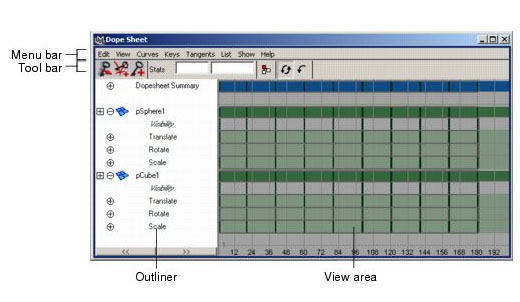
Fig7-8 Dope sheet editor
To Place the Dope Sheet in a View
Select the view.
Select Panels > Panel > Dope Sheet.
Keyframe Animation
Keyframe animation is the standard animation method. In this method, you set keys for an object's extreme positions and let the computer fill in the in-between motion. A key is an anchor point for a particular attribute at a designated time. When the animation reaches that specified time, the object's attribute will be at the value you set. As you set keys, you specify the time at which those changes in the attribute's value take place.
To set keys with the auto keyframe method, you click the Auto Keyframe button in the Range Slider (it turns red to indicate that it's enabled). With auto keyframing, you can animate quickly by simply dragging the Time Slider to a given frame and then changing an attribute.
Nonlinear Animation
Nonlinear animation is a more advanced method of animation. Unlike keyframing, nonlinear animation is completely independent of time. You blend and layer animation sequences—called clips—to set up the motion for objects. You can also use this method to explore variations in parts of the animation without losing your previous work or affecting other parts of the animation. For example-you can make the walking part of the animation a clip and then adjust the leg motion without affecting the way the rest of the character moves.
Graph Editor
The Graph Editor is a helpful tool for tweaking values for keys you have set. It gives you a visual representation—a curved line—of the attributes that are animated. The animation time goes from left to right, and any keyed variable appears as a line that ramps up or down to indicate its value over time. It can help you visualize how things are changing and how fast. You can pan and zoom this panel like any other.

Fig7-5 Graph Editor
To use it as a free-floating window, simply open it from the Hotbox (Window >Animation Editors> Graph Editor).
Graph Editor's Components
Menu bar
The Graph Editor menu bar contains tools and operations for manipulating animation curves and keys with in the graph view of the Graph editor. The Edit menu is similar to the one in text editors or word processors, except that you're working with keys instead of text.

Fig 7-6 Menu Bar
The Edit Menu
The menu items appear under Edit menu behave in a similar fashion to the main Edit menu in the modeling view.
The View Menu
This menu controls which components are visible, and therefore editable, in the graph view of the Graph Editor.
The Select Menu
These options control which component of an animation curve are available for selection and editing.
The Curves Menu
The Curves menu gives you control over how the curves are set up with the keys in your scene.
The Keys menu
This menu includes Tangents which causes the manipulation of an in or out tangent handle.
The Tangents Menu
This describes the entry and exit of curve segments from a key.
The List Menu
This menu Loads the objects.
Toolbar
The toolbar gives you quick access to functions for modifying animation curves and keys.

Fig 7-7 Toolbar
Buffer curves Use Buffer Curve snapshot and swap Buffer curves to compare changes to the current animation curve with its previous shape.
Break Tangents Allows manipulation of the in and out tangent handles individually so you can edit the curve segment entering the key without affecting its opposite handle.
Unify Tangents causes the manipulation of an in or out tangent handle to affect its opposite handle equally. It retains the relative position of the tangent handles even after tangents are individually adjusted.
Lock Tangent Weight specifies that when you move a tangent ,only its angle can be changed.
Free Tangent Weight specifies that when you move a tangent ,only its angle can be changed. This allows the weight of a tangent to be adjusted as well as the angle.
Clamped tangent creates an animation curve that has the characteristics of linear and spline curves. The key's tangents will be spline unless the value of two adjacent keys are very close.
Step tangent creates an animation curve whose out tangent is a flat curve.
Flat Sets the in and out tangents of the key to be horizontal.
The Dope Sheet
The Dope Sheet is another animation editor in Maya that is similar to the Graph Editor. Instead of displaying curves, the Dope Sheet displays key times as colored rectangles and lets you edit event timing in blocks of keyframes and synchronize motion to a sound file.
To open the Dope Sheet
Select Window > Animation Editors > Dope Sheet

Fig7-8 Dope sheet editor
To Place the Dope Sheet in a View
Select the view.
Select Panels > Panel > Dope Sheet.

0 comments:
Post a Comment